Devils Tower

Devils Tower

Monday, April 30, 2012

AXLE-RIFFIC Part 1

I think this deserves a Mr. Hanky, since the axle is one of the final crappy things I have been putting off doing.
Hidey Ho!!!!!!!!!!
I pulled off the wheels and drums and did a little inspecting.  I dropped the axle on a floor jack and rolled it out from under the trailer.  Looks a little odd, huh?
I drug out the old sandblaster and cleaned up the axle to inspect for cracks or signs of fatigue. I figure if anything would leave me stranded, it would be axle related.
 I was surprised to find the leaf springs dated 8-62, so I guess the axle and springs were factory.  


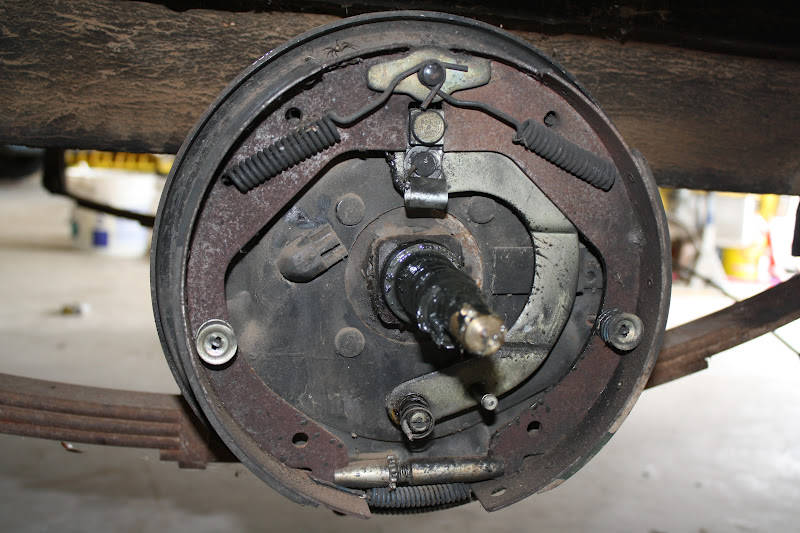
Some of the parts are missing, which would explain why the brakes would never engage.  The first thing I did was measure the brakes to make sure they weren't some obscure configuration made of the rare space age material, "Unobtainium."  Luckily, these were the standard run of the mill, 10"x 2-1/4" brake shoes that fit just about everything.  I went to my trusty Mac and quickly looked up one of my favorite sites, www.etrailer.com, where I found the backing plates fully assembled with brake shoes, magnets and all new hardware.  They are made by Dexter axle in this great country of the USA and they only cost $38 per side.  Sign me up.  The missing magnet s $25 alone.
These got really hot at some time.  You can see the bluing of the steel.
The spindles show signs of being hot in it's 50 year life, but I don't know if it were this set of bearings or a previous set. So, these are getting cleaned up and bagged for a spare set, in case we are ever on the side of the road.  I honestly think these are fairly new, but who knows.  I probably won't have $40 in all of the bearings and seals, it's cheap insurance and it makes me feel better.  I called the local parts house and they can round up all the bearings etc. by tomorrow.  That's about when my backing plates should show up.

In the meantime, I decided to paint up the axle and do a little cosmetic work on the wheels and tires.  Since I had some time in between coats of paint on the axle, I figured I would clean up the wheels and tires while they were easy to get to.  I scrubbed the old farm dirt off and threw a fresh coat of paint on the wheels.  You can't really see them with the hubcaps installed, but remember, I am OCD, so it would bother me knowing they looked like crap under the hubcap.

Baby can't have polished shoes with ugly buckles, so I threw the caps on the buffer.  The caps I am running are 1956 Oldsmobile.  I like them.They have the globe in the center and since we will be world travelers in the Avalair, they are the perfect fit.


The pics are not that great, but here is the axle all painted up.  I'll post part II when the other parts show up and we can install this bad boy.

Saturday, April 21, 2012

Have you ever met that funny reefer man?


Not the same kinda reefer you're thinking of.....or what Cab Calloway is singing about.


This kinda refer...


Interior is in decent shape.  Needs cleaning, but that can wait.

1963 Dometic refer, original equipment

Giant freezer capable of holding two single ice trays.


I have been dreading getting this thing going.  I knew I had to find out if it worked.  The previous owners said everything worked.  Funny, so far nothing has.  I figured as much.


The dreaded test.  
I rigged up a propane tank and regulator to the refer, to start my test.  I used a digital thermometer that had the humidity gauge and temp.  I got it fired up pretty quick and it ran for 8 hours.  The temp only dropped to 50 degrees Fahrenheit.  Not too good.  So, I did some reading and found the service manual online.  The internet is a beautiful thing. 
I laid in bed pondering this for a while.  I had pretty much decided to buy a new fridge, just to expedite things.  I started thinking about the design of the ammonia absorption fridge and came to the conclusion that if it is heating, it should be cooling.  I jumped up out of bed at midnight and went out and cleaned the orifices and adjusted the flame height.  I reset my timer and stuck the thermometer back in the fridge and went back to bed.
  I laid in bed all night wondering if the trailer would burst into flames and all of my work thus far would have been in vain.

 I have the old bunsen burner style gas valve, so I was a little unfamiliar with this setup.  I jumped up first thing in the morning to check the thermometer.  What would it read?  The same? Worse?
How does 32 degrees grab you?  I left it on max for 24 hours just to see what happened when the noon sun started warming things up.  It never budged.
I win.

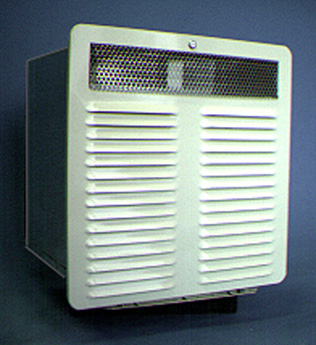
I noticed a propane smell in the cabinets while I was running the refer.  That scares me.  So I started looking at the simple things like the area around the flue.  On newer Rv's they have a roof mount vent to get rid of the spent gasses.  This one has a shelf right above the flue that keeps all of the propane inside the trailer.  Not good.
  I spent a few hours caulking all the seams around the back of the refer cabinet to ensure that no fumes could get into the cabinets and closets.  I added a sheet metal drip pan below the fridge to keep out the rain and to help seal up the giant void left behind by the manufacturer.  I then decided to order up a small efficient computer fan to help move air across the cooling fins and to help push the fumes out of the cavity.  This is not a new idea, but a fairly cheap way to help alleviate a couple of issues.
I was able to find a vendor on ebay selling 12V adapters that matched the requirements of the fan.  I think I paid 4 bucks for this adapter.  It is designed for CCTV cameras, but I don't care.

I bought a couple of high volume fans from a computer parts house. I think this one ran a whopping 8 bucks.  I bought 2 of these as well. Word of advice.....don't start these fans while they are teetering on the back of your refrigerator coils.  The blades explode on impact.  Glad I bought two.
I made some stand offs out of stainless fuel line tubing I had laying around.  I made them about 1.250" long.  I would have made them longer, but the #8 screws maxed out at 3.00".  I am sure I could have found some if I had ventured into town on Monday, at some speciality hardware company, but I am pretty lazy.


I had an old 5 Amp breaker laying around, so I installed it just in case. I really need about a 2 amp, but I will have to look for one.  I just fabbed up a hokey bracket to mount my breaker in.  Kinda cheesy, but you can't really see it.

It draws quite a bit of air across the coils.  I added the provisional wiring for another fan, since I already had it.  I may add another fan if I can find one local.

THE PRESSURE'S ON.....WILL IT HOLD WATER?

Time is running out and the summer camping season is upon us.  I started this little adventure Mother's day Weekend, of 2011. That's almost a year and I am still not camping.


Time to kick it up a notch.
Pump up the jams......kicking it old school this weekend........

I finished the plumbing last weekend and I decided that I needed to pressure check the water system, prior to filling it with water.

 I decided to build my own tester.  I started out at Camping world.  I needed some sort of hose that would adapt to my city water port.


I have a leakdown tester that I use when setting up the mechanical fuel injectors on my drag car.  I made a small modification to that and we were off and running.

I put 35 PSI on the first gauge, that shows us the input pressure, the second gauge shows us how much leakage we have.  Ideally, it should read the same, but if you have leaks, it will be lower.  If you have a lot of leaks, it will really show up.  I pressurized it for about 2 hours and left it.  I had a leakage rate of approx. 2 psi.  I soaped all of the fittings to look for air bubbles, but couldn't find anything obvious.  It must be in the valves for the sink.  They are the only thing that could be suspect.  They are original equipment.

Let's see if it holds water.  I had Mama Root manning the water spigot in case we needed to hurry up and shut it off.  Things could get very treacherous.
Be careful Capt. Root!!!!
Slowly, Mama Root opened the valve ever so slowly, waiting as the water careened down the hose, heading for it's final destination. The hose lurched as the pressure valve gurgled.  What would be the outcome?  Our superhero is in danger.  Would his cheeseburger get wet?  His french fries soggy?
Would our hero be washed downstream as he fights for his life?  Would he meet his fate in a watery grave, crashing to the rocks below? 
Oh, the horror.....I can't watch.....
Actually, nothing happened. Sorry to disappoint you.  I'm still in tact.
No leaks, no muss, no fuss.  The only issues are a small seep around the hot water valve on the sink and the sink neck needs an O ring.  I had to buy a replacement valve and O ring which resolved the issue. Surprisingly enough, my buddy that owns the local hardware store had one on the shelf.  I guess the design must have been good one to still be producing it 49 years later.
All clamped up and ready to put the dinette back in place.
I also found a few things to help organize the trailer without getting cheesy.  I have been looking for towel racks, organizers etc. to help maximize the space we have, without looking modern.  I want to keep the trailer functional without ruining the atmosphere.  
 I found this chrome wire cage toilet paper holder at one of the big box hardware stores for 5 bucks.  Funny thing is, it hooks perfectly over the rear window in the trailer.  This way it can be removed when you don't need to take care of bidness.......
 I also stumbled onto a matching set of wall hooks that match the shower caddy perfectly we had bought months ago.  These will work out good for hanging wet clothes or towels in the shower to dry.
I just drilled them and threw a couple of 3/16" pop rivets in them.  They seem sturdy enough.  The list is getting shorter.


Wednesday, March 28, 2012

SPRING BREAK THRASH-O-RAMA Day 6- It's almost over

Spring break is coming to a close and I have to go back to college.....well, umm maybe not.   I would be like Jethro going to college.
I'm a thinker ya know......
I am going to have to go back to work, if nothing else, so I can rest.
I feel like I got quite a bit accomplished.  I still have a "To Do" list, but it is getting more manageable every day.  The "Have To Finish" list is getting really short, the rest is purely cosmetic and ergonomic.
I will post pics of the water heater install today.
I have a closet that is pretty small and would work well for a utility/hot water heater closet.  I trial fit the heater in the closet and decided this would be the ideal spot.  There were a few fit and finish issues with this closet.  I noticed that there was a piece of trim that looked like it had been wet, so I started to investigate.
Well, as I suspected the trim was there from the factory to hide their miscalculations.  There was a 1 inch gap between the refrigerator wall and the access door wall.  This basically allowed water to leak into the closet from the outside, if it rained and blew in the louvers.  Nice.
I decided to build a free standing support to hang the water heater on anyway, since it is 35 lbs. empty.  So, I removed the trim and cut a couple of 2x2's and screwed them to the structure.
I went ahead and added some caulking to the boards and installed them wet.  I will cover this with a sheet of 1/2" plywood.  This will give me solid structure to screw the heater to.
Here is a picture after it was caulked in and painted.  It could use another coat, but I need to get rolling.  It's a closet.......stop worrying about it.
Root is such a hack.......
I figure if anything is gonna kill this thing, it will be vibration.  So, I figure I will mount it in rubber.  I had bought some rubber isolator pads from Bob Drake for one of my hot rod projects.  These things are pretty cool.  I use them on everything.
I have struggled with where and how to route the exhaust on this deal.  I wanna make sure that the exhaust looks in place for the roof line.  I even looked at routing the exhaust over to the furnace exhaust and tying it together.  The problem was, I would lose a cabinet, so I opted not to do that.
This was going to take some ciphering.  This was on a radius and I had to compensate for the angle of the exhaust tube.  Let's see, that will probably take some geometry, some algebra, maybe some calculus.  Well, let's see, I hate math so those are out.  I'll guess.
There is a shelf inside the closet that I will need to go through before I can punch the hole in the roof.  I could remove it, but I wanted something to attach the exhaust stack to. 
After staring at the roof line and measuring 1,568 times, I closed my eyes and drilled through the bottom skin.  I grabbed my trusty hole saw and hoped for the best.  I was pleasantly surprised to see that the hole came out in a good location.  Now to test fit everything.
The unit comes with an exhaust stack built specifically  for this unit.  It has a cone built in to help diffuse the gasses and to help muffle it. I wanted to retain this tube, but it needed a large clearance from other combustible materials.  I decided to install double wall chimney flute.  It has a zero clearance rating, meaning it can be touching basically anything combustible, without fear of ignition.
Fire Marshall Bill even gives me the thumbs up.
In essence, we will have a 3 layer tube pawing through the shelf and the roof line.   But, because I worry too much, I decided to add the stainless pass through that came with the kit.  I will mount this on the bottom of the shelf.  It has a smaller hole inside, that is the same exact diameter as the exhaust tubing.  This centers up the tube in the chamber, creating a 1/2 inch gap all the way around.  I attached the flange to the stove pipe and screwed it to the shelf.
I left it hanging down so I could show you the way it came out.
This is what it looks like installed.  
A picture of the inner roof panel where it is installed.  A little bit of high temp caulking should be sufficient.
Here is  what the unit looks like in it's natural state.  The tricky part is going to be sliding this all up through the stove pipe, hold the rubber mounts in place, while running the screws in.
Who's yer daddy?  That's what I am talking about.  I just have one more issue to remedy.  I need a power source for the fan and igniter board.
It just so happens that I have an empty receptacle above the refrigerator in a cabinet.  I punched a hole in the cabinet and solved that quickly.
This is what it looks like with the vent cover installed.  I am looking for a better looking cover, but for now, this one will have to suffice. I ended up with roughly about .015" clearance, which makes me extremely happy, that will minimize the areas that could leak.  I'll put a nice fillet seal around it and everything will be peachy.
You can see the profile of the vent on the roof line.  The ginormous vent in the front is the factory installed furnace.  Just for reference, I will add the pics of how meticulously they installed the furnace flute.
Factory installed with loving hands.
I still need to install the water lines and the copper for the propane, which I should be able to tee off from the refrigerator.  But for now, this will have to do, because I am out sick.....ugh.

Saturday, March 24, 2012

SPRING BREAK THRASH-O-RAMA Day 5- The Contraption

I decided way back that I wanted something other than a 6 gallon hot water heater.  That lasts on average about 4 minutes.   That's great if you are after a sponge bath.  Fat guys need more water.
So, I opted for the instant water heater.  They do make one for an RV, but they are pricey. I bought this one off the internet for under $200.  I had to shop around but I found some way cheaper than others.  It sounds expensive, but call on a new Atwood 6 gallon hot water tank.  This will sound pretty good.
I found an Ecotemp FV-12-LP and decided it might fit the bill.

It says  in the instructions not to install it in an RV.  I called the tech support line and the nice gentleman told me it had to do with DOT regulations.  I assume that there is probably a lot of red tape to be certified by the DOT, hence no one wants to tackle the issue of getting certified for production, for such a small market.
What?? The government has paperwork??????
 So, I am not advising you to install one of these in your RV.  You are big kids, use your own judgement.
My biggest fear was that the LP regulator in the trailer would be too small or the LP tanks wouldn't provide an ample supply etc. and I wouldn't figure this out until after I had already cut the hole for the exhaust.
So, I decided to spend a little time fabricating a test cell to ensure that I wouldn't be wasting my time.
Meet "The Contraption."
  I used the size of tank that I will have on the trailer along with an automatic switch over regulator, a 110V power source and the fittings that allow me to hook up a garden hose to a 1/2" pipe fitting.
One thing that I did find out was that I had to add a faucet valve to the end of my line to simulate back pressure, otherwise I would get an error code.
I added one similar to my outlet hose to help slow down the flow rate.

I will tell you this, I don't know how it does it, but it must be magic.  The water going in was 65 degrees and coming out the digital readout was showing 170 degrees and it was smoking hot. So hot, I couldn't put my hand under it and it was within seconds. It is quieter than a typical RV hot water heater and way more efficient.  The dry run was a success, although I think it will take some finesse in finding the sweet spot on the temperature.
I will cover the installation in another post.
******************UPDATE**************
I had a nice gentleman send me a comment concerned that the reason this was not designed for an RV was because that it could be hazardous to my health.  He offered to sell me one at cost, which is a very nice gesture and I do appreciate it and for that I applaud you Frank.

  Frank owns an Airstream restoration outfit and he does great work.  I respect his opinion, but that started me to thinking, why is he concerned?
  I think he must be under the impression that this one vents inside. That would be an issue. They do sell portable ones at Camping World etc. that are not vented.  Here is a picture of the ones that are a no-no.  Now, these are great outside, just not inside.


 DO NOT USE THESE in your RV. You will die. It must have the chimney stack in order to expel the spent gasses. 


 The water heater I chose, the Ecotemp FV-12-LP, has a blower fan to push the gasses outside.  This unit is designed to be used in an area where people live, i.e. a house.  I wouldn't install it just to save a buck, I have been researching this for about a year.  The instant hot water heater I chose is pilotless and only kicks on when the faucet is opened.  The fan kicks on and then the heater lights.


 To be fair, I want to post a picture of the RV500, which is an option for those that don't mind cutting into the side of your camping trailer.  I have talked with people that have this unit and they are happy with it.  It is a nice setup, but not cheap.  Retail is around $950.
Honestly, I am more concerned about by 1963 Dometic refrigerator that doesn't vent very well.  It has an open flame all the time.  I am addressing that situation as well, which will be in another post.  Thanks for the comments and I hope you enjoy my blog.