Devils Tower

Devils Tower

Sunday, September 25, 2011

It's crap day............

We know it's crap day because Mr Hanky is here.............


I have been putting off a few things lately.  When the trailer was still in the possession of the previous owner, there was an issue with the rear window.


Let's just say divorces and angry wives can get ugly in a hurry.

The weapon of choice.
Now, I can't find a replacement window.  I figured I would at least drill it out to see the exact dimensions on the inside of the frame.  If anyone has a 28"w x 29"h roll out window, I'd be interested in it.


Since I have the back inner wall removed already, I figured I should go ahead and repair all of the loose ends on the back wall.  
Dirt and tape residue needs to be removed.
That includes removing the name plates and the clearance lights so that I can clean it up.  I was afraid there would be a lot of corrosion under the plates.  It was pretty dirty, but no corrosion.  The rear window was covered with plastic and duct tape while it sat outside.  The residue from the tape got hard and was a pain in the butt to get off.  Duct tape has a place in society, but not for extended periods of time.
That's gonna hurt when he pulls it off.
I drilled out the solid fasteners (rivets) and cleaned up the face of the nameplates.  I also started on taping them off to repaint.  I used the vinyl tape used for custom striping.  It keeps a pretty decent edge.


All taped up and ready to spray.
I started cleaning the back wall and decided that I would throw a buffer on it, just for giggles.  The top panel isn't anodized like the rest of the trailer, for some odd reason.  It did polish up though. I looked like Al Jolsen by the time I was finished.
Buffer anyone?
It only got worse as the day progressed.


It polished up nicely. The only problem is that Mama Root wants the rest of it to match..............


Monday, September 5, 2011

Last Day of the Labor Day Thrash.......I saw the light, Part 3


OK where was I?  I left off with the marks on the back of the trailer.
So, we have the center hole.  No turning back now.  Now that I have a 4.5" hole cut in the sheet metal, it gets kinda flimsy.  So, I need to stiffen it up with a doubler.  Generally,  doublers need to be heavier than the base metal.  So I opted for .063".
I drew it out using the redneck compass method.  I cut it out using a jigsaw, which is time consuming.
This is the doubler in rough out mode.  I laid out the hole pattern and did a few other things that I left out that are self explanatory.
I clecoed the plate in place.  If you don't know what a cleco is, I'll explain.
This is how I store my clecos.  Just drill a series of holes in a piece of aluminum.
Clecos are used mainly in the aircraft sheet metal business.  They come in all shapes and sizes, but here is a general rule of thumb.  They are coded by color, by drill size.  For instance, a silver cleco is a number 40 drill bit.  A #30 is copper colored, a #20 drill bit is black.  This is a chart I stole from Aircraft Spruce's website.  


You can buy used clecos from a place called "The Yard" in Wichita, Ks.


How do they work?  Basically, you drill a hole in both parts and using special "cleco Pliers", you depress the cleco and push it through both sides, then release.  You're done.
This a pic of the doubler installed with the light in place, kinda ugly.

The rings were riveted back on using solid rivets, which stiffened up the skin in a major way.  I added nut plates to the backside, so I don't have to tear out the sidewalls if I need to remove the tail light lens.  Now I can remove the 4 screws and access the tail light from the outside easily.

The final product.  I still need to round up the chrome pieces to dress it up, but I still have time. 


Sunday, September 4, 2011

I saw the light.....Part Deux....


The next thing I am going to tackle is more of a personal pet peeve. I hate working on lights. I wouldn't even be working on them now, but they are holding up progress on the inside of the camper.


 I want bright lights that I don't have to mess with.  Nothing sours a vacation more, than a visit  from this guy. 


The other thing is I need them to look good as well as being functional.  Since the goal is to pull this with a 1957 Ford, I think it only right to use 57 Ford tail lights.


The original lights were plain and basically ugly, in my opinion.  

These stock tail lights remind me of Devo.  I always hated Devo.
Devo still sucks after 25 years.

So where is this guy going with this?  Just sit back and relax.
I'll explain.  I want to keep the vintage looks without sacrificing usability.  Plus, I can't see using the old stock tail lights, when I can make improvements in looks and function.

My goal is to do away with the old 1157 type of bulb and convert to LED lights all over.  They draw less power, have no bulbs to change, they are vibration resistant and much brighter.  Also, they are sealed and thus impervious to water.  The only drawback is that they are directional.  

I went by a trailer manufacturer/dealer and they had a pretty sweet LED setup.  I hate the looks of those tail lights that just have a series of dots inside a red lens.  To me, those are dorky.  So I sprung for the ones that have reflectors all over the inside of them.  These are still only like $18 ea.  
These mount in a rubber donut, so they will be insulated from vibration.

After removing the Devo hat, this is what I have to start with.  It is shot on with solid fasteners (Rivets), so I had to drill out the mounting rivets.  These lights were sketchy at best coming home when we first bought the trailer.


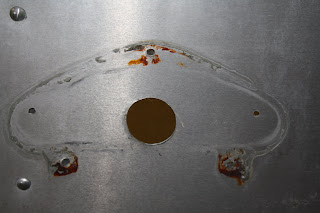
This is what I expected to see.  Corrosion never helps a ground, so this is part of the problem.  With the new setup, this all goes away. The housing is plastic and it is mounted in rubber, so it is sealed, no need for a plate to trap moisture.


The aftermath........another nicely crafted hole and stained skin.  This will require some thought.  I need to make sure the new lens is lined up and matches everything aesthetically, but I have to pick up that crazily located factory hole.


The first thing I needed was my new lens.  I wanted to see how close this new LED tail light would fit under the 57 Ford light.
I bought 7 of these for 5 bucks a piece from a guy.
Perfect fit.
It worked out well.  I just need to make sure that the light is centered inside the Ford lens to help disguise it .  I don't think the brightness should be affected by having 2 lenses to pass through.  It may even work to my advantage, by diffusing the light further.


I had to mock up the lens and mark it with a Sharpie just to verify the location.  Measure 57 times, cut once.


My redneck tools.
I bought some of those cheap protractors during "back to school sales."  Then I use my redneck attach mechanism....a tie wrap.
Then I needed to mark the center of the new 8 inch lens. and I would scribe a circle the same diameter as the rubber grommet that the light mounts in.
I have to cover the old uglies, but keep the light centered while encompassing the old hole.  The outside line is the new lens, and the inside line is the light mount hole.  The X marks the center of the outer line. 


 Tomorrow, I will mark the other side and push it outside with the lenses taped in place to verify their proper location.


Saturday, September 3, 2011

I saw the light........Part 1 Labor Day Thrash


Well, it is another 3 day weekend and I am hoping to get something done this weekend.  You see a pattern yet? 


 It's been so freaking hot, I can't seem to muster up any ambition.  Something like the 62nd day over 100 degrees.  The boy came home from college to try out our new swimming pool. ONe of the benefits of living in a gated community, I suppose.
We're gonna attack this in sections because there is a lot of crap to wade through. 


 First section is the raggedy license plate bracket and tag light.  This was a pretty easy swap, since almost 50 years later, they still make this exact part.  I couldn't believe it.  I picked this one up from Vintage Trailer Supply, but I am sure it could be had from a truck/trailer supply house.
Mounted with solid fasteners and has never been removed.
I drilled it off and the back of it is pretty corroded.  The main reason lights quit working  trailers is bad grounds.


This is what the skin looked like after removing the bracket.  You can still see the pencil marks from the factory.


This hole was so delicately made with loving hands.

  It was sharp and jagged.  This will take some clean up, even though you can't see it, I know it's there.
2 minutes with a rotary files works wonders.
Before

After.  It looks crooked, but it's not.  It's the angle of the camera.  I went back and remeasured just to make sure.
I think it looks better.  More tomorrow.