Devils Tower

Devils Tower

Sunday, July 14, 2013

The NOVA tow vehicle Part 1

So, I picked this up a few weeks ago for the new tow vehicle. I decided to chronicle the build to sort of document it for future reference.
   The project was about 75% complete.  It had new paint, new motor, new transmission but was still lacking the interior and the wiring.  It has a brand new small block Chevy out of a 89 Suburban with the entire serpentine belt system still in place.  The interior was pretty rotten.  The seats were trashed, headliner and carpet missing. 

 The floorboards are awesome.  It had one bad floorboard that was replaced by the previous owner.
I am trying to approach this methodically, because I have AADD,  (Automotive Attention Deficit Disorder).  I am starting with the inside first.  I have ordered a quart of POR-15 to coat the floors with.  
This stuff is pretty tough stuff.
I also decided, after much research to try Fat Mat.  It is a sound deadener, similar to Dynamat, but way cheaper.  I am going to cover the entire floor with it, after the POR 15 dries good.


I bought the 50 mil material.  It comes with a roller and some seam tape. This stuff will be a good base.  The thing that drives me crazy about old cars are the harmonics caused by crazy vibrations.
I also ordered a carpet kit from http://www.stockinteriors.com , we will see how it works out.  I ordered the heavier carpet.  It has something called "mass backing".  That should also help with road noise.
We recently decided to sell our modern SUV and build something a little cooler.  So we did, now we are committed.   I want this to be a utilitarian, daily driver so I opted for a rubber style mat rather than a carpet.  I ordered a roll of a material known as "coin mat".  This one is a little different than the standard coin mat because it doesn't have a circular pattern, these are more square.  Basically, the same material though.  This will cover most of the rear cargo area.
You can pick some up on Amazon.  Coolio mat for hot rod heroes

In the meantime, I need to stay busy waiting for my stuff to show up, so I started by removing the seats and prepping the inside for the POR15.  I started by pulling the outside air vents.  I didn't want to get the floor all clean and then have dirt and leaves contaminate the fresh surface.  It was a hunch, so I pulled them to see if over the years the leaves hadn't fallen down in the cowl vents.

Both sides were exactly the same.  50 years of accumulation.  Luckily, no rust down inside.


It all looks pretty solid.
Mama Root sanded the back of the seat panels.
Before we started.
Seat back during sanding.
 After primering.

We even primered the seat hinges.  
Now to wait.

Sunday, July 7, 2013

A new addition to the stable

My wife decided that she needed another wagon to pull her Avalair, so she started perusing Craigslist. 

 She came up with a nice little 1963 Chevy II Nova wagon for sale about 3 hours away. She is all about period correctness, so this 63 wagon should be the perfect match for the 63 Avalair.

 It was a partially finished project, that needs a little more tlc to get it where it needs to be.  Here are a few pics from my weekend endeavors.


Hopefully the last time this will ever be on a trailer.
At home in the stable.

OOPS, I did it again.......

I tore something up.  My dad always told me I could tear up a steel ball with a rubber hammer.
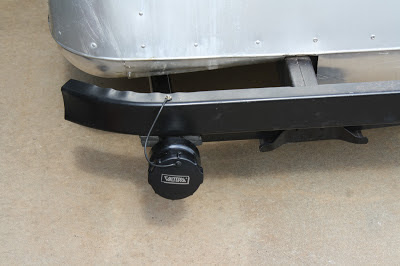
When my son and I were pushing the Avalair back in the shop the other day, we hooked the gray water drain on my rototiller.  Basically, exploded the down spout.
I never liked this setup anyway.

I had to make an access hole.  This is not the finished product.  I'll square it all up and finish it out, then make a cover for it all.

I decided to standardize the outlet to accept the regular sewer hose, due to the fact that most campgrounds require a donut on the hose going into the ground.

I bought the fitting from Camping World.  I carried it into the local hardware store.  I found a rubber bung that is stepped and tapered.  It is mainly used in non-pressure situations for drains etc.  It fits pretty tight.  I forced it in and then cut the end off to allow enough clearance for a close out cap.  Then I painted the pipe with plastic paint, hoping that it may not be super noticeable.
It just barely clears the jacks when they are retracted.  I mounted the pipe in rubber, with a saddle clamp to the rear bumper.

We will see how it works in the near future.


Friday, July 5, 2013

SLIDE ON OVER HERE BABY.......


One of the casualties from our Big Trip were the bed slides.  Although, they probably were sufficient in the day, they didn't hold up to the Clydesdale family.  We big people Baby!

 Actually, it was cracked, but I thought it would make it.  I was wrong.  It was kind of a crappy design anyway.  It had 2 rails with grooves cut into them allowing the male side to slide in the groove.  Probably cheaper to manufacture.
  I always overbuild, so I started researching heavy duty drawer slides used in industrial applications.  I looked at RV slides, firetruck slides etc and came up with a suitable substitute.

Don't mind the words watermarked on the pic.  Aparently, there are tons of people stealing pics of drawer slides....
Big Bad Drawer Slides for Manly Trailers

  These slides are roller bearing with a 500 lb load limit, which is insane.  That means my family can lay on the bed while I roll it in or out.  We won't mention that fact. 
 These bad boys weigh 8 lbs each.  They have a 5 year warranty, which says a lot.  I know I won't even need the 500 lb capacity, it may have 30 lbs on it max.  However, I love stuff that I don't have to touch ever again, so therefore, overbuild......
The culprit
After notching the front side of the bed, I was able to install the slides.
Then I added a 2x4 to attach the bed top.
This one fought me to the bitter end.

Next I decided to do away with my arch nemesis.  These things piss me off to no end. Off with your heads!
There were 2 on the bed originally.  They are always flopping down in the way, locking up the bed where you can't slide it out.  Not any more. 
I measured the legs and made retractible leg system out of 3/4 inch steel tubing.  All three legs come up at the same time and stay out of the way.

Here they are folded up.  If you are wondering why the bed is all of a sudden painted.....I got carried away after painting the legs.  I still need to go to the hardware store and find some rubber feet to prevent chewing up the tile.

All folded up and it slides in and out with one hand.  Way better.  It wasn't as easy as it looked though.  I had to modify every single piece of the bed and the air conditioner area.  I labored over this stupid thing for approximately 10 hours.
I had a reader submitted a comment, asking about the bed in the slid out position. Well, here ya go. All ready for action Jackson!  I would have answered your comment, but apparently you can't edit one after it is published. Whodathunk it?  As far as your other question about the air conditioner, I believe it is back in August of 2011.  Look in that general area.  Thanks.