Devils Tower

Devils Tower

Wednesday, March 28, 2012

SPRING BREAK THRASH-O-RAMA Day 6- It's almost over

Spring break is coming to a close and I have to go back to college.....well, umm maybe not.   I would be like Jethro going to college.
I'm a thinker ya know......
I am going to have to go back to work, if nothing else, so I can rest.
I feel like I got quite a bit accomplished.  I still have a "To Do" list, but it is getting more manageable every day.  The "Have To Finish" list is getting really short, the rest is purely cosmetic and ergonomic.
I will post pics of the water heater install today.
I have a closet that is pretty small and would work well for a utility/hot water heater closet.  I trial fit the heater in the closet and decided this would be the ideal spot.  There were a few fit and finish issues with this closet.  I noticed that there was a piece of trim that looked like it had been wet, so I started to investigate.
Well, as I suspected the trim was there from the factory to hide their miscalculations.  There was a 1 inch gap between the refrigerator wall and the access door wall.  This basically allowed water to leak into the closet from the outside, if it rained and blew in the louvers.  Nice.
I decided to build a free standing support to hang the water heater on anyway, since it is 35 lbs. empty.  So, I removed the trim and cut a couple of 2x2's and screwed them to the structure.
I went ahead and added some caulking to the boards and installed them wet.  I will cover this with a sheet of 1/2" plywood.  This will give me solid structure to screw the heater to.
Here is a picture after it was caulked in and painted.  It could use another coat, but I need to get rolling.  It's a closet.......stop worrying about it.
Root is such a hack.......
I figure if anything is gonna kill this thing, it will be vibration.  So, I figure I will mount it in rubber.  I had bought some rubber isolator pads from Bob Drake for one of my hot rod projects.  These things are pretty cool.  I use them on everything.
I have struggled with where and how to route the exhaust on this deal.  I wanna make sure that the exhaust looks in place for the roof line.  I even looked at routing the exhaust over to the furnace exhaust and tying it together.  The problem was, I would lose a cabinet, so I opted not to do that.
This was going to take some ciphering.  This was on a radius and I had to compensate for the angle of the exhaust tube.  Let's see, that will probably take some geometry, some algebra, maybe some calculus.  Well, let's see, I hate math so those are out.  I'll guess.
There is a shelf inside the closet that I will need to go through before I can punch the hole in the roof.  I could remove it, but I wanted something to attach the exhaust stack to. 
After staring at the roof line and measuring 1,568 times, I closed my eyes and drilled through the bottom skin.  I grabbed my trusty hole saw and hoped for the best.  I was pleasantly surprised to see that the hole came out in a good location.  Now to test fit everything.
The unit comes with an exhaust stack built specifically  for this unit.  It has a cone built in to help diffuse the gasses and to help muffle it. I wanted to retain this tube, but it needed a large clearance from other combustible materials.  I decided to install double wall chimney flute.  It has a zero clearance rating, meaning it can be touching basically anything combustible, without fear of ignition.
Fire Marshall Bill even gives me the thumbs up.
In essence, we will have a 3 layer tube pawing through the shelf and the roof line.   But, because I worry too much, I decided to add the stainless pass through that came with the kit.  I will mount this on the bottom of the shelf.  It has a smaller hole inside, that is the same exact diameter as the exhaust tubing.  This centers up the tube in the chamber, creating a 1/2 inch gap all the way around.  I attached the flange to the stove pipe and screwed it to the shelf.
I left it hanging down so I could show you the way it came out.
This is what it looks like installed.  
A picture of the inner roof panel where it is installed.  A little bit of high temp caulking should be sufficient.
Here is  what the unit looks like in it's natural state.  The tricky part is going to be sliding this all up through the stove pipe, hold the rubber mounts in place, while running the screws in.
Who's yer daddy?  That's what I am talking about.  I just have one more issue to remedy.  I need a power source for the fan and igniter board.
It just so happens that I have an empty receptacle above the refrigerator in a cabinet.  I punched a hole in the cabinet and solved that quickly.
This is what it looks like with the vent cover installed.  I am looking for a better looking cover, but for now, this one will have to suffice. I ended up with roughly about .015" clearance, which makes me extremely happy, that will minimize the areas that could leak.  I'll put a nice fillet seal around it and everything will be peachy.
You can see the profile of the vent on the roof line.  The ginormous vent in the front is the factory installed furnace.  Just for reference, I will add the pics of how meticulously they installed the furnace flute.
Factory installed with loving hands.
I still need to install the water lines and the copper for the propane, which I should be able to tee off from the refrigerator.  But for now, this will have to do, because I am out sick.....ugh.

Saturday, March 24, 2012

SPRING BREAK THRASH-O-RAMA Day 5- The Contraption

I decided way back that I wanted something other than a 6 gallon hot water heater.  That lasts on average about 4 minutes.   That's great if you are after a sponge bath.  Fat guys need more water.
So, I opted for the instant water heater.  They do make one for an RV, but they are pricey. I bought this one off the internet for under $200.  I had to shop around but I found some way cheaper than others.  It sounds expensive, but call on a new Atwood 6 gallon hot water tank.  This will sound pretty good.
I found an Ecotemp FV-12-LP and decided it might fit the bill.

It says  in the instructions not to install it in an RV.  I called the tech support line and the nice gentleman told me it had to do with DOT regulations.  I assume that there is probably a lot of red tape to be certified by the DOT, hence no one wants to tackle the issue of getting certified for production, for such a small market.
What?? The government has paperwork??????
 So, I am not advising you to install one of these in your RV.  You are big kids, use your own judgement.
My biggest fear was that the LP regulator in the trailer would be too small or the LP tanks wouldn't provide an ample supply etc. and I wouldn't figure this out until after I had already cut the hole for the exhaust.
So, I decided to spend a little time fabricating a test cell to ensure that I wouldn't be wasting my time.
Meet "The Contraption."
  I used the size of tank that I will have on the trailer along with an automatic switch over regulator, a 110V power source and the fittings that allow me to hook up a garden hose to a 1/2" pipe fitting.
One thing that I did find out was that I had to add a faucet valve to the end of my line to simulate back pressure, otherwise I would get an error code.
I added one similar to my outlet hose to help slow down the flow rate.

I will tell you this, I don't know how it does it, but it must be magic.  The water going in was 65 degrees and coming out the digital readout was showing 170 degrees and it was smoking hot. So hot, I couldn't put my hand under it and it was within seconds. It is quieter than a typical RV hot water heater and way more efficient.  The dry run was a success, although I think it will take some finesse in finding the sweet spot on the temperature.
I will cover the installation in another post.
******************UPDATE**************
I had a nice gentleman send me a comment concerned that the reason this was not designed for an RV was because that it could be hazardous to my health.  He offered to sell me one at cost, which is a very nice gesture and I do appreciate it and for that I applaud you Frank.

  Frank owns an Airstream restoration outfit and he does great work.  I respect his opinion, but that started me to thinking, why is he concerned?
  I think he must be under the impression that this one vents inside. That would be an issue. They do sell portable ones at Camping World etc. that are not vented.  Here is a picture of the ones that are a no-no.  Now, these are great outside, just not inside.


 DO NOT USE THESE in your RV. You will die. It must have the chimney stack in order to expel the spent gasses. 


 The water heater I chose, the Ecotemp FV-12-LP, has a blower fan to push the gasses outside.  This unit is designed to be used in an area where people live, i.e. a house.  I wouldn't install it just to save a buck, I have been researching this for about a year.  The instant hot water heater I chose is pilotless and only kicks on when the faucet is opened.  The fan kicks on and then the heater lights.


 To be fair, I want to post a picture of the RV500, which is an option for those that don't mind cutting into the side of your camping trailer.  I have talked with people that have this unit and they are happy with it.  It is a nice setup, but not cheap.  Retail is around $950.
Honestly, I am more concerned about by 1963 Dometic refrigerator that doesn't vent very well.  It has an open flame all the time.  I am addressing that situation as well, which will be in another post.  Thanks for the comments and I hope you enjoy my blog.


Thursday, March 22, 2012

SPRING BREAK THRASH-O-RAMA Day 4 -Curtain Call

Things are starting to come together.  Mama Root has been slaving away on the curtains for months on end.  They had to be just right.  They had to have the right colors, the right material, the right pattern to reflect 1963.   It's the little details that make the difference.
She searched the internet, the fabric stores and just about anywhere that might have fabric.
She finally found this place in Arkansas called  Interior Mall Fabric.  These people have some cool vintage styled fabrics, fair prices and are generally just nice people.  Give them a call.  http://www.interiormall.com/


Mama lined all of the curtains with that blackout material, cause she didn't want any peeping Toms staring at Root's fabio bod.

Here are a few shots of the window treatments.
Welcome back to 1963.
Kitchen window 
Back window

Cool little divider curtain, huh?

I used an expandable closet rod for my curtain rod.
The trailer is starting to feel finished, even though we still have quite a bit to go, I am happy.  Good job Mama Root.

SPRING BREAK THRASH-O-RAMA Day 3 - Lay some pipe


This is what I have been dreading the most,  the plumbing.
The original plumbing had frozen and busted the copper lines.  
Originally, there was a water tank under the front dinette.  It was an aluminum tanks that held about 10 gallons and had a hand pump.
Although, we plan on staying in RV parks most of the time, we opted for a small tank in the original position.  I decided to try and maximize the tank size by finding a tank that would fill up the space under the dinette.
  I finally found the good people at http://www.plastic-mart.com/.  They will find a tank that fits your space and then add threaded bungs for fittings anywhere you want.  I sketched out what I wanted and faxed it over.  They have a sales rep call you to verify what you want.  About a week later, I had a custom built tank for under $200.
I screwed some 2x2's to the floor to keep the 
My dad has been converting his house from copper to pex tubing, mainly due to necessity and he has all the crimpers etc. for the new style tubing. 
 I grew up learning to pretty much do everything for myself.  Not because we are so talented, but rather because we could never afford to hire things done.  Not much has changed.......
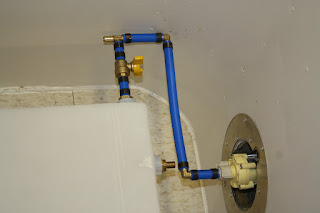
So here are a few pics of the system I am building.
I always think about reliability first and then maintenance second.
I am planning a few things into the system to lessen the mundane, boring tasks.
I  have never liked those silly little water filler ports, so I opted for the ability to pressure fill my water tank.  By adding ball valves strategically allows me this option.  I added the city water port with the built in pressure regulator.

I had a drain installed on the very bottom of the tank.  I had it placed in the outboard forward corner.  This will help in winterizing.
I added a maintenance port for winterizing.  All I will have to do is close one valve and open the other and I can siphon the antifreeze into the system.
Maintenance port.

It is located right next to the pump in a cabinet that i hard to use for storage anyway.  I lined the floor with a piece of 3/8 thick rubber mat.  This will keep the noise down when the pump is operating.  The pump is a 115V park model.  I don't have a 12V system, so this is the best option.

The backside f the shower.
Mama Root laughs at me because I am anal.  I wanted red for hot and blue for cold.  It would have stressed me out to have all one color tubing. I guess I may be OCD. It makes sense in my head.
This was a huge hurdle.  Although, I still have a days work ahead of me, we cleared some major ground.  I'm glad I had my dad helping me. 
 Next, I need to get the hot water tank installed.  I still have some clamping to do, to make sure the lines aren't flopping around.


Tuesday, March 20, 2012

SPRING BREAK THRASH-O-RAMA Day 2 - Hit the shower 3

Day 2 on the Thrash-O-Rama and things are creeping along.  Nothing seems to be going easy.  I decided to do something I could finish.  The shower curtain rail.
Mama Root found this aluminum, bendable track at http://www.curtain-tracks.com/.  Pretty cool.  The only bad thing was the freight was more than the parts.  They did come in a super-strength indestructo tube, though.  It comes as a kit, so that makes it easy.
It allows up to a 2" radius, so we used a roll of electrical tape to make our bend.  Worked pretty good.  Any aerosol can would work as well.
Mounted it to the ceiling using pop rivets.  It comes with 5 ceiling mount brackets in the kit.  We had enough to wrap it around a decent amount.
Mama Root has been searching high and low for a groovy shower curtain that would represent the colors we have and also that has a mid-century modern feel to it.  Believe it or not, we found an off the shelf item at JCP and it was around $20.
This is the fun stuff.


SPRING BREAK THRASH-O-RAMA Day 1 -Make it happen


GO ROOT GO !!!   YOU CAN FINISH IT !!!!! WOO HOOOOOO!!!!!
Here I am on the first day of Spring Break, having a good time with all of my new found friends.......oh wait.....that's not me.  I'm working on this stupid travel trailer instead.  Well, these guys are cheering us on, I suppose.
I took this week off for 2 reasons, my daughter had surgery and we figured we could work on the Avalair after she was feeling better.

Summer is approaching rapidly and we have a major outing scheduled with all of our family.  If we don't make it,  we'll never hear the end of it.
We have tackled a lot of different projects, trying to "divide and conquer."  Mama Root started buffing all of the window frames, as we discussed previously, then she added new aluminum screen to all of the frames.  That was a time consuming job, but it made a huge difference.
One of the many screens we did.
One of the projects I needed to do badly, was to fabricate some sort of curtain rod hangers.  Mama Root has been sewing curtains and valances like a mad woman and my office is littered with all of it. This will get it out of the office and plus it will scratch about 6 different things off of my "To Do" list.
I cut out 14 flat patterns and sort of figured out what we needed.  I wanted lightweight, but sturdy.  I opted to use 2024 T3, .050" thick aluminum. This is way heavier than I need, but I don't like to do things more than once.
After laying out the flat pattern I de-burred all of the edges.  This handy little gizmo will save you hours of filing.  It is used primarily aircraft sheet metal shops.
Just run the V down the edge of the material.

  One of my favorite places to drop by when I am in Wichita, KS, is "The Yard."  They have tons of new/used aircraft sheet metal stuff for sale.  You can get anything I talk about, sheet metal tool wise, at the yard.  http://www.yardstore.com/
Another trick I like to use, which makes machinists cringe, is marking my hole patterns with a set of calipers. (These are cheap Harbor Freight, Chinese Charlie calipers, so they work great for this.)


  I just figure out first, where I am going to bend the metal to a 90, mark that first.  I decided on .750" or 3/4". By the way, I don't like fractions. Carpenters use fractions when you can fudge 1/8", we keep closer tolerances than that. 
Converting to decimals is way easier.  If you hate math, like I do, the easiest way to think of decimals is in terms of money.  A 1/4" is a quarter or .250", a 1/2" is half dollar or .500".  Get it?  There won't be a test.
STUPID FRACTIONS!!!
So I find .750 on the calipers and lock them in place.  Then I just lay the edge of the caliper on the edge of the sheet metal and pull a line from top to bottom.  This scribes a straight line on the aluminum and makes it nice and straight.  Then I do the same thing with the hole spacing. 
 I like to use Uni-Bits on sheet metal, the make nice round holes.  I measured my curtain rods with my calipers and put a piece of tape on the bit to mark where to stop.  It's a cheap drill stop.
 To keep it simple, I used half of .750" which is .375".  I did the same thing on the edge distance from the ends.  I just scribed the other direction.  Now, all I have to do is drill where the lines intersect.  Easy, huh?


(Some of you may find this rudimentary, but a lot of folks work in offices and don't have a clue about hand tools.)
I plan on using a 3/16" pop rivet to attach these to the walls.  That equates to a #10 drill bit.
With that all done I need to bend this up.  I don't have a sheet metal break here, so I opted for the hillbilly method.....the vise.  I clamped it up and used a piece of wood the bend it over. I used duct tape to cover the jaws of the vise.  It's crude, but it worked. 
 Now, I need to remove all of the scratches etc. that has marred up the aluminum, I did this by polishing them up with a Roloc Scotchbrite pad. 
Now for paint.  I painted these with a satin finish, just to kinda make it blend.  The curtain rods will be painted the same color. I skipped all the paint pics.  You get the idea.